.net, Community, Hackathon

Running the first Global AI Bootcamp in Belfast

I’ve run the Belfast Azure User Group for a couple of years now, and try to arrange events for my community every couple of months. Here in Belfast, we’ve a really vibrant technical scene, and I love having the opportunity to give everyone a chance to participate in things like the Global Azure Bootcamp in 2018 and 2019, and for the first time this year, the Global AI Bootcamp.

In case you haven’t heard of it, the Global AI Bootcamp is a free, one-day event organized by communities across the world who are passionate about Artifical Intelligence on Microsoft Azure. The keynote video for the 2019 event is at this link, and sample sessions and workshops are available on GitHub here. The global organizers (Henk Boelman and Amy Boyd) have arranged for Microsoft to assist community organizers during the day by supplying Azure Passes (each pass is worth $50 and is valid for 7 days), and also ensuring that each attendee gets a free lunch from Subway on the day of the event. This is a massive help for community organizers like me – getting Subway meals helps me have one less thing to worry about! – and the free passes ensures that everyone who wants to try something on Azure gets a chance to do that. And we were very fortunate this year to have ESO Solutions as a sponsor, who paid for the room hire.

This year, Belfast had three speakers in the morning:

Jonathan Armstrong spoke about the AI Revolution in Healthcare.

jonathan2.jpg

Mark Allan showed us how to make sense of your unstructured data with Azure.

mark

Yongyang Huo talked us through the Travelling Salesman Problem and how AI could be used to improve services (and have some fun too).

yongyang

And everyone was able to get a sticker as a memento of the event, as well as one attendee who was lucky enough to win a copy of the book shown below (Practical Automated Machine Learning on Azure).prize.jpg

In the afternoon many of the attendees stayed to try out the event’s workshops, featured on Github here. There was a range of skills, from people just trying it out for the first time to others who use Machine Learning every day at work, and I believe everyone was able to learn something from the talks – they were some of the best talks we’ve had so far at our user group.

For 2020, we’ve already got some great speakers and events lined up – our next event is in February, myself and some contacts are already arranging an Azure hackathon, and I’m looking forward to more Azure and DevOps Bootcamps in April and May next year!

.net core, Azure

Solving some strange behaviour on Azure App Service with a URL containing non-ASCII characters

Recently I hit a strange problem after deploying an application to my Azure App Service – I saw errors appearing occasionally with some HTTP GET requests for URLs with some unexpected escape characters.

After digging into this a bit more, I found the solution – in this post, I’ve created a very simple scenario to demonstrate recreating the issue, and then I describe how I solved the problem.

Let’s say I’m working on a C# MVC site which gives some information about different countries, and I’d like to display the page’s URL in a friendly format as shown below:

/Home/Detail/{Country Name}

e.g. running through the ISO 3166-1 list of countries
/Home/Detail/Afghanistan
/Home/Detail/Åland Islands
/Home/Detail/Albania
...etc.

So I might want to validate the country name passed into the query string against a known list of countries (e.g. ISO 3166-1), and query a data source for the information I want to display.

And redirecting to a friendly URL from within a controller is a pretty ordinary thing to do in MVC – I might have carried out some other actions in an HTTP Post request, or maybe just redirect as shown below.

code

As an example, the image below shows my locally hosted web application, with the URL in the format I want, and a title on the page showing some information about Canada (which I could have retrieved from a database, but in this example I just display the country name from the query string).

canada image

I know I shouldn’t be displaying data on the page straight from the query string – I’m only doing it in this example to make the demonstration clearer. Don’t do this in your application.

So far, so trivial.

And if I increase the complexity a little bit with a non-ASCII character in the country name – like the “Åland Islands”, which is second in the list of countries – it all still works locally. The space between the two words becomes percent-encoded (%20) but that makes sense to me.

code

Now let’s deploy this application to a Azure App Service.

This is where it all goes wrong

Because if we browse to our App Service website with a country that has a non-ASCII character…it displays completely differently!

code

The unicode character hasn’t become percent encoded, it’s actually rendered as two other non-ASCII characters. So my nice, readable URL has become confusing, and my application can’t easily compare the country name in the query string to the list of ISO 3166-1 country names. Now that I’ve deployed to my cloud platform, I’ve got a problem I didn’t encounter locally.

The character “Å” has now been rendered as two separate UTF-8 characters – you can read more about this character here: https://en.wikipedia.org/wiki/%C3%85

Interesting…what about if I browse directly to the page using “Åland Islands” in the query string?

…it works as expected. Stranger and stranger.

code

So in summary, I’ve found that on an Azure App Service, if I try to redirect to a page with a URL containing non-ASCII characters, the resulting URL which is actually browsed to will be encoded differently to how I expect.

For what it’s worth, I think this isn’t a bug. It’s worth checking out the standards for more information about what is and isn’t allowed in a URI/URL:

URIs: https://tools.ietf.org/html/rfc3986

URLs: http://www.faqs.org/rfcs/rfc1738.html

What’s the solution?

After a lot of digging, I found there’s a really simple solution to this in .NET Core’s System library – Uri.EscapeDataString(string) – this converts characters, except for RFC2396 unreserved characters, to their hexidecimal representation.

I can change my code’s redirect to be this:

LocalRedirect($"/Home/Detail/{Uri.EscapeDataString(validatedCountryName)}");

And when the code below runs…

Uri.EscapeDataString("Åland Islands")

it is percent-encoded to the UTF-8 form to become:

%C3%85land%20Islands

This isn’t really human readable right now, but helpfully my browser reconverts it back into a readable string in the URL, and it’s rendered recognisably by my page.

code

So a small code change to escape non-ASCII characters using URI.EscapeDataString fixes my application’s function – my URL is readable again, and can be easily compared to a list of ISO 3166-1 countries.

Wrapping up

So this post might seem to be about how to correctly encode strings, but really I think it’s about making sure that you remember to test with character sets that you’re not familiar with, and also testing on an environment which is as similar as possible to your production environment. There’s always a way to make your application available to people who might not use the same alphabet as you.

.net core, AI/ML, Visual Studio, Visual Studio Plugin

Trying image classification with ML.NET

After watching dotNetConf videos over the last couple of weeks, I’ve been really excited to try out some of the new image classification techniques in Visual Studio.

The dotNetConf keynote included a section from Bri Actman, who is a Program Manager on the .NET Team (the relevant section is on YouTube from 58m16 to 1hr06m35s). This section showed how developers can integrate various ML techniques and code into their projects using the ModelBuilder tool in Visual Studio – in her example, photographs of the outdoors were classified according to what kind of weather they showed.

As well as the keynote, there’s another relevant dotNetConf talk by Cesar de la Torre which is also available here on what’s new in ML.NET

And the way to integrate this into my project looks very straightforward – right click on the project -> Add Machine Learning -> and choose what type of scenario you want to use, as shown in the screenshot below. I’ve highlighted the feature that I’m really interested in – image classification.

ml image classification

I don’t want to re-iterate in detail what was shown in the presentation – please check out the video as it’ll be much clearer than me just writing a wall of text! – but the demonstration showed how to add images as training data: categorise those images into different folders, and name the folder how you’d like to classify those images.

  • So for example, put all your images of cloudy skies into a folder called “Cloudy” – or put all your images of sunny skies into a folder called “Sunny”.
  • The model builder will create a model of what it thinks is a sunny sky or a cloudy sky.

And when you point your code at a new image and ask it to predict what kind of weather is shown in that image, the code will compare that to the model constructed, and make a prediction.

This really appealed to me – powerful ML techniques presented in a way that’s easy to understand by developers who maybe haven’t done any work with deep neural networks. No need to try out (or even understand) Cost/Loss functions or Optimisers for your model, and even the model is just a zip file that you reference in your code like a library. This is tremendously powerful, especially to .NET developers like me who are trying become familiar with the technique and what’s possible.

How can I do this myself?

The ModelBuilder extension for Visual Studio is available for download here and you can read more about it here.

The only catch is that the image classification function isn’t actually generally available yet (sad face here). But it’s not far off – I’ve read the extension will be updated later this year. The image below shows what’s available at the time of writing this.

ml model in reality

But I want to try it now, I don’t want to wait…

Fortunately there’s a way to try out image classification in ML.NET without the model builder in VS2019 – there’s a fully working example on GitHub here. This project classifies pictures of flowers, but it’s easy to pull the code and start using your own dataset.

Beyond Cats and Dogs

It’s almost canonical now to demonstrate image classification using pictures of cats and dogs and showing how tools can generate a model that distinguishes between them reliably. But I wanted to try push the tools a bit further. Instead of distinguishing between two different species like cats and dogs – which I can do myself – could I use machine learning (and specifically ML.NET) to distinguish between and identify different pedigrees of dogs (which is something that I don’t know how to do)?

First thing – finding a training data set

Fortunately I was able to find a really helpful dataset with over twenty thousand pictures of dogs from the Stanford site, and also super helpfully they’ve been categorised into different types using a folder structure – exactly the way that ML.NET image classification needs images to be arranged.

The dataset is about 750MB – just below the ML.NET’s present limit of 1GB – so this is a perfect size of dataset. There’s lots of other information like test and training features – but I chose not to use these additional features, I just wanted to throw the raw images at ML.NET with classifications stored in the folder names, and see how it performed.

Second – modifying the worked example

The example – “Deep Neural Network Transfer Learning” – is straightforward example code. It downloads the original dataset from a zip file, which is specified using a URL hardcoded into the DownloadImageSet method.

  • I was able to modify the code to point to a folder of classified pictures of dog breeds which can be downloaded from here.
  • Then I was able to drop my own images that I wanted to use the model on into a folder called “DogsForPrediction” (instead of FlowersForPrediction) and update the code to point to this folder.

Then I just ran the code.

Results

As you’d expect, because there were over 20,000 images, it took a long while to work through the sample – 80% were used for training, and the remaining 20% used for testing the model, and the model was trained over 100 epochs. On my machine it took about a couple of hours to work through the training and testing process before it got to the part where it was predicting the type of dog from my own test images.

And it worked very well. I tried with about 10 photos that weren’t in the original dataset and it predicted each one correctly. I was surprised given the wide range of photographs (some photos were close ups, some were long range, some were pictures of the whole dog, some with just the head, some even with people in them too). But maybe I shouldn’t have been surprised – maybe that range was actually the reason why it worked so well with the photos I asked it to predict.

I even fed in a couple of photos that I thought would trick the model. One is of a rescue dog (a King Charles Spaniel – called Henry if you’re interested), and I didn’t think this breed was in the training data.

henry2

The model predicted the breed to be a “Blenheim Spaniel” (55% certainty).  I had never heard of this breed, but it seems to be this is an alternative name for the King Charles Spaniel. So I guess the model is smarter than I am 🙂

Another photo I tried was of another rescue dog (this one isn’t a breed – again if you’re interested, he’s called Bingo). There’s no way that the model could correctly predict an answer, because this dog isn’t a recognised pedigree. We always suspected that he was half German Shepherd, but I was interested to see what my model tried to classify him as.

large bingo

First attempt didn’t go so well – he was classified as a Tibetan Mastiff with about 97% certainty, and that’s definitely not right. But to be fair, it was a big picture with lots of non-relevant features, with only a small dog in the centre of it.

For my second attempt, I cropped the image…

bingo

…and this time (again, maybe not surprisingly) the top prediction was German Shepherd, with a certainty score of about 56%.

bingo results

Wrapping up

I’ve just started dipping my toes into the water and learning a bit more about what’s possible with ML.NET. And I’m impressed – the work done by the ML team meant there were far fewer barriers to entry than I expected. I was able to identify a reasonably complex challenge and start trying to model it with just a few changes to the open source sample code. This was really helpful to me and the way I like to learn – looking at sample code of real world complexity, and then start to understand in more detail how sections of that code works. I’m looking forward to using ML.NET to solve more problems.

Dataset References:

Primary:
Aditya Khosla, Nityananda Jayadevaprakash, Bangpeng Yao and Li Fei-Fei. Novel dataset for Fine-Grained Image Categorization. First Workshop on Fine-Grained Visual Categorization (FGVC), IEEE Conference on Computer Vision and Pattern Recognition (CVPR), 2011.  [pdf]  [poster]  [BibTex]

Secondary:
J. Deng, W. Dong, R. Socher, L.-J. Li, K. Li and L. Fei-Fei, ImageNet: A Large-Scale Hierarchical Image Database. IEEE Computer Vision and Pattern Recognition (CVPR), 2009.  [pdf]  [BibTex]

Azure, Azure DevOps, Azure Pipelines, C# tip

Adding Environment Variables to an ARM template for Azure App Services

I like to have one click deployments for my web code – first to create my infrastructure, and then deploy the website.

But one of the challenges I’ve had in the past is that I’ve needed to make sure my resources (e.g. databases, key vaults etc) have unique names. ARM templates helpfully provide resource functions to generate unique names, but I won’t know what these names are until the infrastructure has been created.

So does that mean I need to first deploy infrastructure, and then introduce a manual step of updating my environment-specific configuration files?  Fortunately not – I can populate environment variables in my website with the names of resources, and in my code I just refer to those variables.

The default ARM template for Azure App Services is really useful, but by default it doesn’t have a section for environment variables to be used by the app service, and I find this is usually one of the first things I do when I’m creating an app service. I’ve needed to do this recently, and I decided to write about how I did that.

When you’re creating an Azure App Service in an ARM template, you probably have something that looks similar to the code below – a resource section to create the hosting plan (i.e. the server farm), and a resource section to create the app service to host your site.

"resources": [
  {
    "apiVersion": "2015-08-01",
    "name": "[parameters('hostingPlanName')]",
    "type": "Microsoft.Web/serverfarms",
    "location": "[resourceGroup().location]",
    "tags": {
      "displayName": "HostingPlan"
    },
    "sku": {
      "name": "F1",
      "capacity": "1"
    },
    "properties": {
      "name": "[parameters('hostingPlanName')]"
    }
  },
  {
    "apiVersion": "2015-08-01",
    "name": "[variables('webSiteName')]",
    "type": "Microsoft.Web/sites",
    "location": "[resourceGroup().location]",
    "tags": {
      "[concat('hidden-related:', resourceGroup().id, '/providers/Microsoft.Web/serverfarms/', parameters('hostingPlanName'))]": "Resource",
      "displayName": "Website"
    },
    "dependsOn": [
      "[resourceId('Microsoft.Web/serverfarms/', parameters('hostingPlanName'))]"
    ],
    "properties": {
      "name": "[variables('webSiteName')]",
      "serverFarmId": "[resourceId('Microsoft.Web/serverfarms', parameters('hostingPlanName'))]"
    }
  }

Environment variables can be created at the same time as the app service by adding another resource to the ARM template.

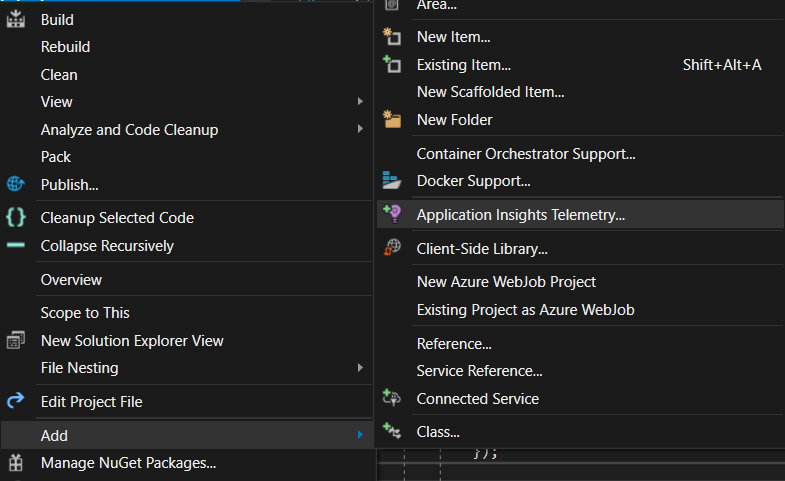
I like to do this through Visual Studio 2019 – as shown below, I open up my ARM project in VS2019, and right click on my template (named WebSite.json) to open the context menu. In the context menu, there’s an item “Show Outline”:

arm outline

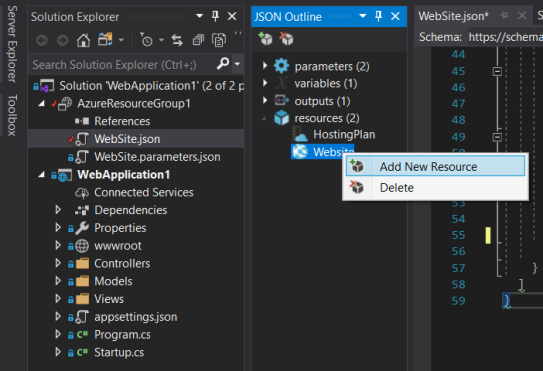
When I click on “Show Outline”, this opens up a new window called “JSON Outline” which shows me what’s in my ARM template – helpfully split into parameters, variables, outputs and resources. As you can see in the image below, I have two resources in my template – the hosting plan and the website.

arm json outline

So if I want to add a new resource, I can right click on the appropriate node, and select “Add New Resource” (as shown below).

It’s important to note that to add environment variables to a website, we have to add the resource to the existing website, so the environment variables will appear as a child object of the website.

arm json add resource

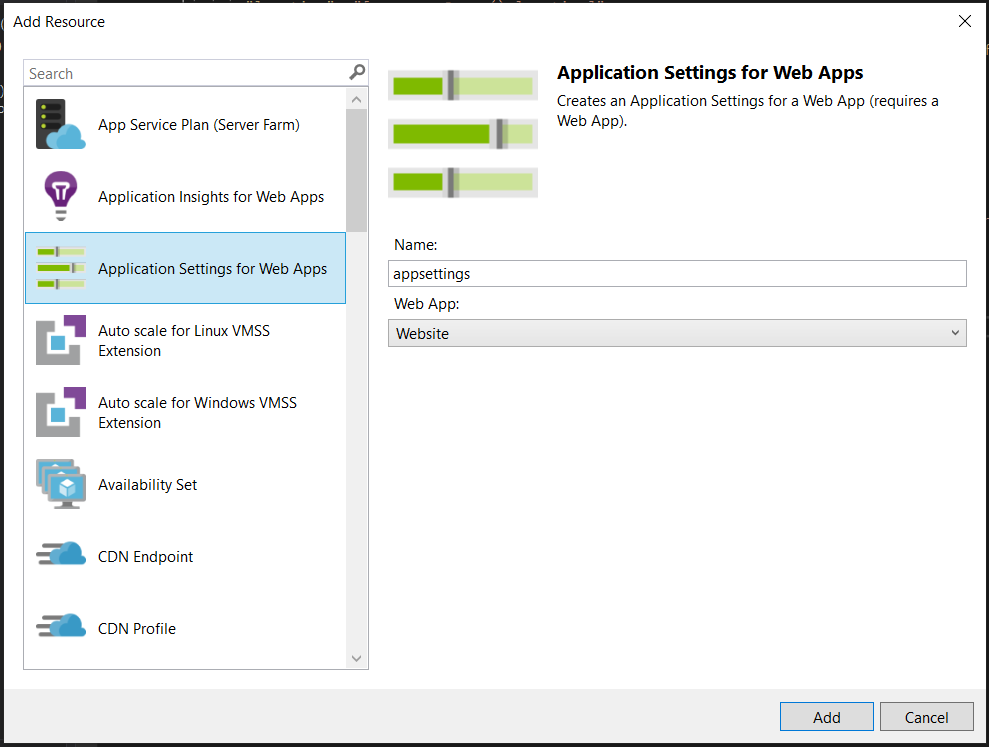
When you click on “Add New Resource”, a window will open that looks like the one below. To add environment variables to the app service, find the “Application Settings for Web Apps” resource (which is highlighted below), and choose a name for the resource – I’ve chosen to call mine “appsettings”.

application settings for web apps

Click on “Add”, and now you’ll see that in your ARM template, your website resource will have an “appsettings” child. This the place where your site’s environment variables will live.

Of course these aren’t the only environment variables in your app service – these are just the ones you’re choosing to add during your infrastructure deployment process.

added appsettings

And this new “appsettings” child object corresponds to the code highlighted in red below:

{
      "apiVersion": "2015-08-01",
      "name": "[variables('webSiteName')]",
      "type": "Microsoft.Web/sites",
      "location": "[resourceGroup().location]",
      "tags": {
        "[concat('hidden-related:', resourceGroup().id, '/providers/Microsoft.Web/serverfarms/', parameters('hostingPlanName'))]": "Resource",
        "displayName": "Website"
      },
      "dependsOn": [
        "[resourceId('Microsoft.Web/serverfarms/', parameters('hostingPlanName'))]"
      ],
      "properties": {
        "name": "[variables('webSiteName')]",
        "serverFarmId": "[resourceId('Microsoft.Web/serverfarms', parameters('hostingPlanName'))]"
      },
      "resources": [
        {
          "name": "appsettings",
          "type": "config",
          "apiVersion": "2015-08-01",
          "dependsOn": [
            "[resourceId('Microsoft.Web/sites', variables('webSiteName'))]"
          ],
          "tags": {
            "displayName": "appsettings"
          },
          "properties": {
            "key1": "value1",
            "key2": "value2"
          }
        }
      ]
    }

This new resource adds a couple of environment variables by default as examples – “key1” and “key2“.

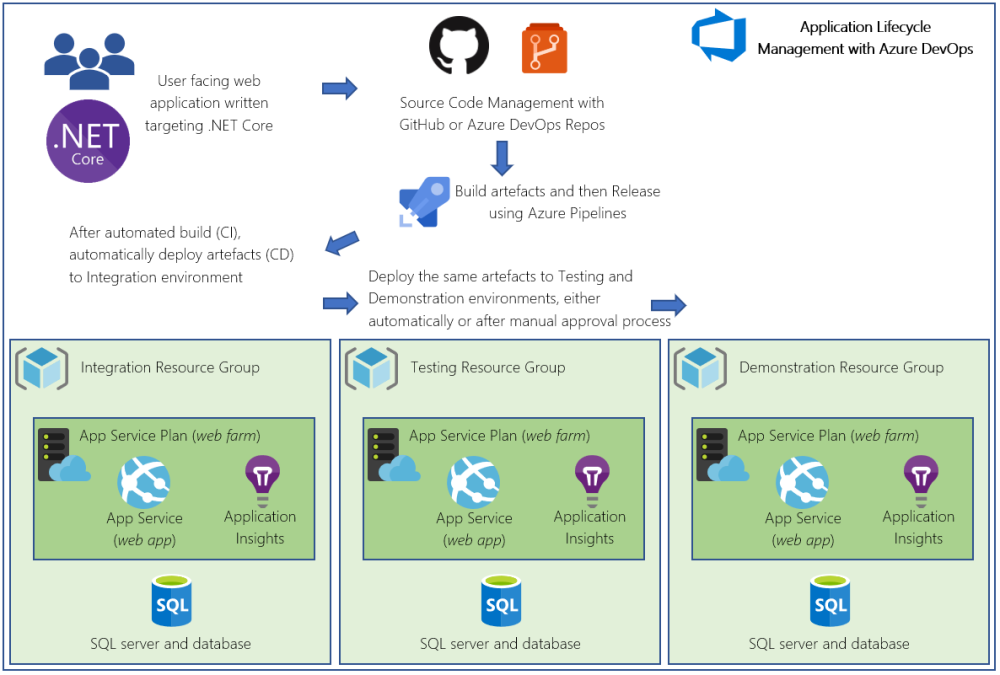
Obviously these are just placeholders, so let’s consider a real example – what about if I want to deploy the same infrastructure across numerous environments, i.e. use the same ARM template, but parameterise it so that one environment is called “integration”, one is called “demo”, and others could be “staging” or “production”?

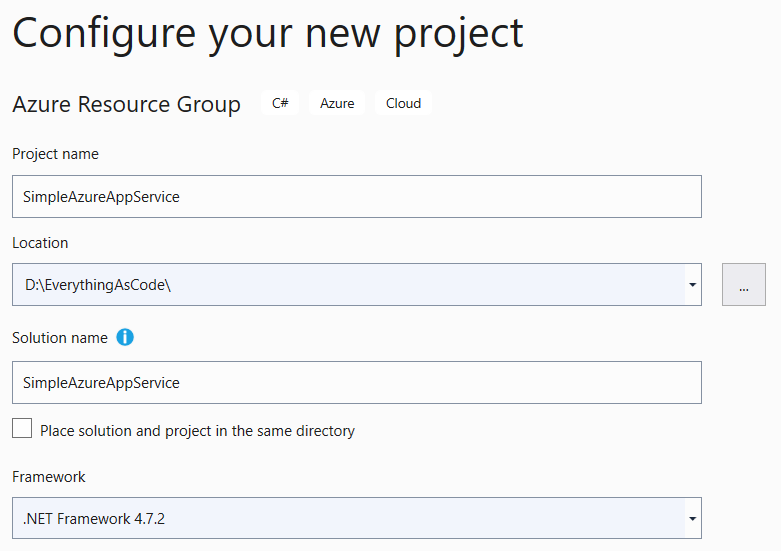
Parameterising our ARM template to accept an environment name is straightforward – we just need to add a parameter to our template, as shown below:

"parameters": {
  "environmentName": {
    "type": "string",
    "minLength": 1
  }
}

And now we can update the environment variable properties to have a key called “ASPNETCORE_ENVIRONMENT”, with the value set by the process that calls the ARM template.

"resources": [
        {
          "name": "appsettings",
          "type": "config",
          "apiVersion": "2015-08-01",
          "dependsOn": [
            "[resourceId('Microsoft.Web/sites', variables('webSiteName'))]"
          ],
          "tags": {
            "displayName": "appsettings"
          },
          "properties": {
            "ASPNETCORE_ENVIRONMENT": "[parameters('environmentName')]"
          }
        }
      ]

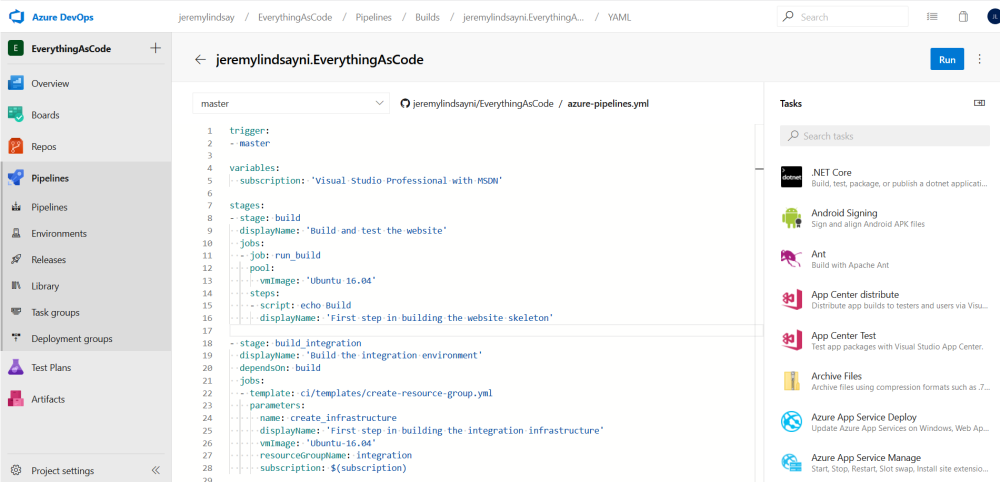
I usually would call my ARM template using the “Azure Resource Group” deployment task in Azure Pipelines, and I can just specify the value of this variable at each deployment stage as follows:

-environmentName "integration"

Or

-environmentName "demonstration"

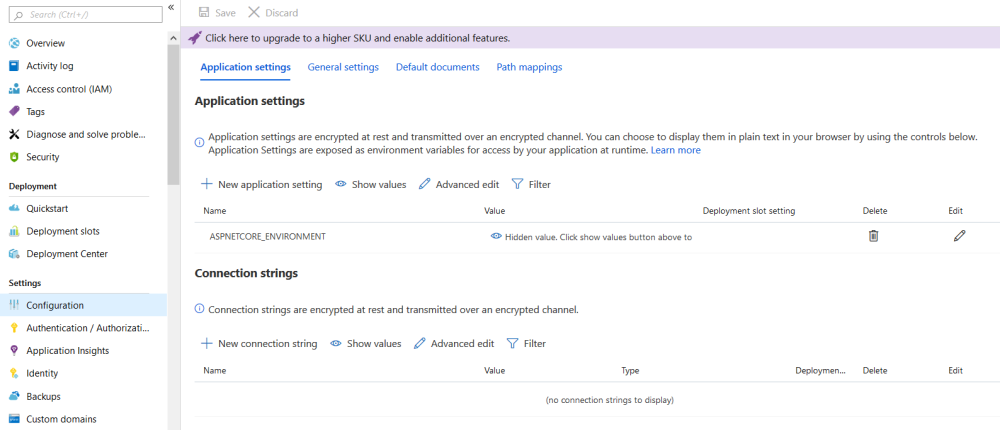
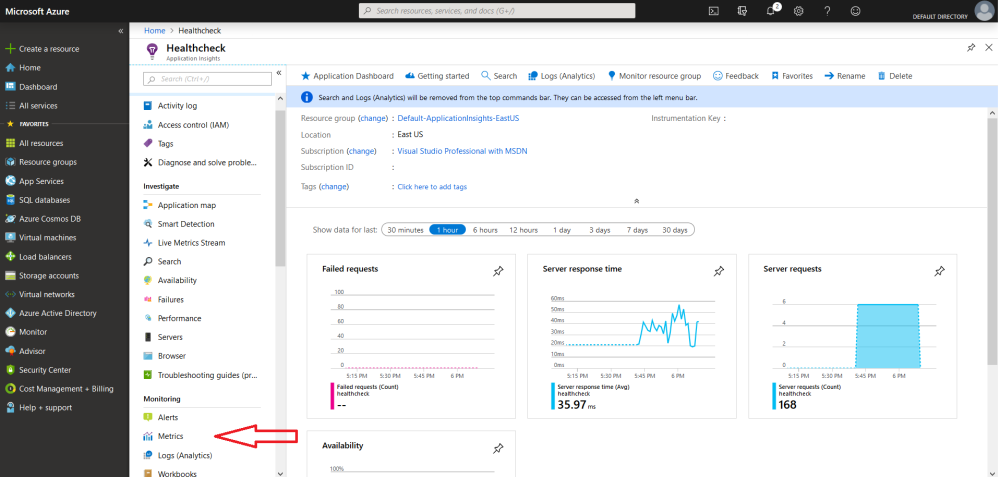
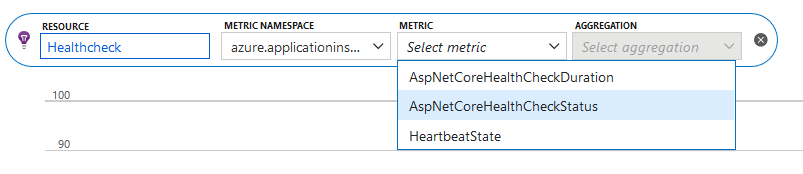
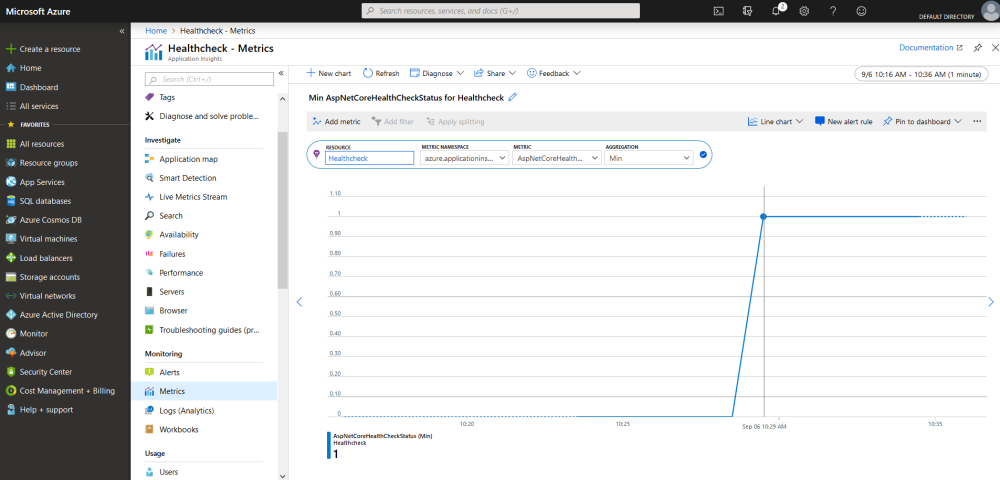
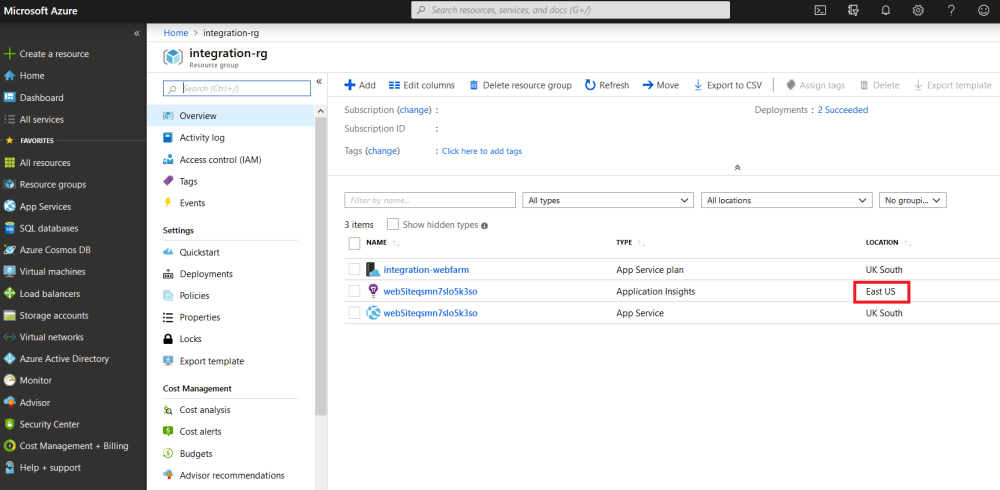
After I create an Azure Pipeline to deploy this infrastructure, I can use the Azure Portal to look at the environment variables for my website by clicking on the app service, and looking in the “Configuration” item, as shown in the image below. This shows that there is now an environment variable called “ASPNETCORE_ENVIRONMENT”.

env variables in web app

And I can access the environment variable’s parameter in C# using the code below:

Environment.GetEnvironmentVariable("ASPNETCORE_ENVIRONMENT")

This is a tremendously powerful technique when creating infrastructure.

Another example is one I mentioned in the introduction – consider when you’re creating a website that uses something like Azure Key Vault to hold connection strings. As I’ve talked about in my last post, you might want the name of the Azure Key Vault to be automatically created during the pipeline with a unique name.

But if I don’t know the name of the key vault when I’m developing my code, how can I refer to it from my code? A common approach is to specify resource names in a configuration file, but if we can’t be sure of the name of the resource until after it has been created, this means we’d have to modify the config file after deployment.

Instead, my approach is:

  • Refer to an environment variable called something like “AZURE_KEY_VAULT” in my code
  • Create the Azure Key vault with a unique name using an ARM template
  • Add an environment variable section which depends on the successful creation of the Azure Key Vault, and update the “AZURE_KEY_VAULT” environment variable with the unique name of the Azure Key Vault.

Now as a developer, I never need to care about what any environment’s key vault name is, and I can happy tear any environment down without worrying about having to manually update or references to resources which might have changed name when I spin it back up – I just need to refer to the name of the environment variable, without ever having to worry about its contents.

The code below shows what my appsettings resource looks like for this scenario:

"resources": [
        {
          "name": "appsettings",
          "type": "config",
          "apiVersion": "2015-08-01",
          "dependsOn": [
            "[resourceId('Microsoft.Web/sites', variables('webSiteName'))]",
            "[resourceId('Microsoft.KeyVault/vaults', concat('myKeyVault-', uniqueString(resourceGroup().id)))]"
          ],
          "tags": {
            "displayName": "appsettings"
          },
          "properties": {
            "AZURE_KEY_VAULT": "[concat('myKeyVault-', uniqueString(resourceGroup().id))]"
          }
        }
      ]

Wrapping up

This has been quite a long post about quite a simple concept – automatically create environment variables in your website for all the Azure resources it uses, and then automatically populate the values of those variables while those resources are being created. But it’s a worthwhile technique to employ – I’ve found this makes spinning up and tearing down environments in one step much easier, rather than having a multi-step process of creating infrastructure, noting the name of resources created, and then updating and deploying XML/JSON configuration files.

Azure, Azure DevOps, Azure Pipelines

Create an Azure Key Vault using ARM templates, Resource Functions, and Azure Pipelines

Recently I’ve needed to create an Azure Key Vault using ARM templates in an Azure pipeline, and I hit a couple of interesting snags – the ARM template requires parameters called “tenantId” and “objectId” – these are GUID values, but it wasn’t immediately obvious to me what these meant and where they come from.

I’ve included below part of my original ARM template that generated my Azure Key Vault:

"resources": [
    {
        "type": "Microsoft.KeyVault/vaults",
        "name": "myKeyVault",
        "apiVersion": "2015-06-01",
        "location": "UK South",
        "properties": {
          "sku": {
            "family": "A",
            "name": "Standard"
          },
          "tenantId": "DD1AA6D2-981F-4158-B30E-2511639CDB22",
          "accessPolicies": [
            {
              "tenantId": "DD1AA6D2-981F-4158-B30E-2511639CDB22",
              "objectId": "22FF9FC0-2832-46D7-8BAB-3855609C6AC1",
              "permissions": {
                "keys": [ "All" ],
                "secrets": [ "All" ]
              }
            }
          ]
        }
    }
]

I’ve included syntax for giving permission to all keys and secrets just to make the code a bit shorter – in a production application I’d obviously restrict access more.

I’ve highlighted in red a few things that I don’t like about this template:

  • The name of the key vault is “myKeyVault”. There’s nothing wrong with that name particularly, except that the generated resource will have a default DNS name of https://myKeyVault.vault.azure.net, which probably isn’t unique and that would cause the build process to fail. I’d prefer this name to be unique.
  • The location of the key vault is hardcoded to be “UK South”. I’d prefer to remove this hardcoding, and generate location at build-time to be the same as the parent resource group.
  • There are two fields – tenantId and objectId – that have GUID values. What are these properties, and can I avoid having GUID’s hardcoded into my ARM template?

Fortunately I can solve all of these problems, mostly using Azure Resource functions.

Generating a unique resource name

In my original ARM template I had specified the name as shown below:

"name": "myKeyVault"

Obviously this has the problem that it’s probably not unique. But I can make the name unique by suffixing the text with a unique value, such as one generated based on the parent resource group:

"name": "[concat('myKeyVault-', uniqueString(resourceGroup().id))]"

Generating the location based on the containing resource group

In my original ARM template, I had the region hardcoded in the way shown below:

"location": "UK South"

But there’s a helpful resource function built in which detects the location of the parent resource group, as shown below:

"location": "[resourceGroup().location]"

Generating the tenantId based on the subscription

The tenant Id is a Guid associated with the connected Azure account – you can find it out by opening a PowerShell instance and running the command below:

Connect-AzureRmAccount

You’ll be asked to log in, and after you present your credentials to Azure, the PowerShell prompt will display information like the tenantId. This is the GUID which appears in the original ARM template.

"tenantId": "DD1AA6D2-981F-4158-B30E-2511639CDB22"

But I don’t really want to commit this to my source code repository – and fortunately there’s a resource function that gets the tenant ID based on the account running the ARM template:

"tenantId": "[subscription().tenantId]"

What about the objectId?

The “objectId” GUID is associated with the user (or Principal) who has permission to interact with the Azure Key Vault.

I couldn’t find a Resource function that gave this to me – I’d love to know if there is one, please let me know in the comments if you find one! – so I managed this by creating a pipeline variable and passing it to the pipeline job.

How can I find the objectId value?

I found my principal Id using the following steps:

  • Open a PowerShell prompt, and run the command below:
Connect-AzureRmAccount
  • Log in as the user to whom you want to give Key vault permissions, and then run the command below
Get-AzureRmADUser

This will return information about the principals associated with this account, including the information listed below:

  • UserPrincipalName
  • DisplayName
  • Id
  • Type

The “Id” value is the GUID that I need to associate with my Azure Key Vault’s “objectId” parameter.

Parameterising the objectId in the ARM template

I altered the “parameters” section of my ARM template to look like this code:

"parameters": {
    "principalId": {
        "defaultValue": "null",
        "type": "string"
    }
},

So my ARM template’s resource section now looks like this:

"resources": [
    {
        "type": "Microsoft.KeyVault/vaults",
        "name": "[concat('myKeyVault-', uniqueString(resourceGroup().id))]",
        "apiVersion": "2015-06-01",
        "location": "[resourceGroup().location]",
        "properties": {
          "sku": {
            "family": "A",
            "name": "Standard"
          },
          "tenantId": "[subscription().tenantId]",
          "accessPolicies": [
            {
              "tenantId": "[subscription().tenantId]",
              "objectId": "[parameters('principalId')]",
              "permissions": {
                "keys": [ "All" ],
                "secrets": [ "All" ]
              }
            }
          ]
        }
    }
],

Now I can edit my pipeline and create a variable, which I’ve called “userprincipalid”, and populate this variable with my own principal identifier GUID:

azure pipeline principal id

And then I can reference this in my pipeline in the “Override template parameters” section, as highlighted below, with the code:

-principalId $(userprincipalid)

pipeline screenshot

Now when I run my pipeline, the stage that deploys an ARM template will create an Azure Key Vault with a unique DNS value, and I’ve removed enough hard-coded values that I’m happy to push the ARM template to my source code repository.

Wrapping up

Often the exported ARM template includes hard coded references to regions, subscriptions, and even GUIDs related to the user currently logged in – this isn’t really suitable for committing and pushing to a source code respository. But often Resource functions are available which can replace these hard-wired values, which leads to more maintainable ARM templates.

.net core, Azure, Azure Application Insights, C# tip, Instrumentation, MVC

Healthcheck endpoints in C# in MVC projects using ASP.NET Core, and writing results to Azure Application Insights

Every developer wants to build a system that never breaks, but in reality things go wrong. The best systems are built to expect that and handle problems, that rather than just silently failing.

Maybe your database becomes unavailable (e.g. runs out of hard disk space) and your failover doesn’t work – or maybe a third party web service that you depend on stops working.

Sometimes your application can be programmed to recover from things going wrong – here’s my post on The Polly Project to find out more about one way of doing that – but when there’s a catastrophic failure that you can’t recover from, you want to be alerted as soon as it happens, rather than hear from a customer.

And it’s kind to provide a way for your customers to find out about the health of your system. As an example, just check out the monitoring hub below from Postcodes.io – this is a great example of being transparent about key system metrics like service status, availability, performance, and latency.

postcode

MVC projects in ASP.NET Core have a built in feature to provide information on the health of your website. It’s really simple to add it to your site, and this instrumentation comes packaged as part of the default ASP.NET Core toolkit. There are also some neat extensions available on NuGet to format the data as JSON, add a nice dashboard for these healthchecks, and finally to push the outputs to Azure Application Insights. As I’ve been implementing this recently, I wanted to share with the community how I’ve done it.

Scott Hanselman has blogged about this previously, but there have been some updates since he wrote about this which I’ve included in my post.

Returning system health from an ASP.NET Core v2.2 website

Before I start – I’ve uploaded all the code to GitHub here so you can pull the project and try yourself. You’ll obviously need to update subscription keys, instrumentation keys and connection strings for databases etc.

Edit your MVC site’s Startup.cs file and add the line below to the ConfigureServices method:

services.AddHealthChecks();

And then add the line of code below to the Configure method.

app.UseHealthChecks("/healthcheck");

That’s it. Now your website has a URL available to tell whether it’s healthy or not. When I browse to my local test site at the URL below…

http://localhost:59658/healthcheck

..my site returns the word “Healthy”. (obviously your local test site’s URL will have a different port number, but you get the idea)

So this is useful, but it’s very basic. Can we amp this up a bit – let’s say want to see a JSON representation of this? Or what about our database status? Well fortunately, there’s a great series of libraries from Xabaril (available on GitHub here) which massively extend the core healthcheck functions.

Returning system health as JSON

First, install the AspNetCoreHealthChecks.UI NuGet package.

Install-Package AspNetCore.HealthChecks.UI

Now I can change the code in my StartUp.cs file’s Configure method to specify some more options.

The code below changes the response output to be JSON format, rather than just the single word “Healthy”.

app.UseHealthChecks("/healthcheck", new HealthCheckOptions
    {
        Predicate = _ => true,
        ResponseWriter = UIResponseWriter.WriteHealthCheckUIResponse
    });

And as you can see in the image below, when I browse to the healthcheck endpoint I configured as “/healthcheck”, it’s now returning JSON:

healthcheck basic json

What about checking the health of other system components, like URIs, SQL Server or Redis?

Xabaril has got you covered here as well. For these three types of things, I just install the NuGet packages with the commands below:

Install-Package AspNetCore.HealthChecks.Uris
Install-Package AspNetCore.HealthChecks.Redis
Install-Package AspNetCore.HealthChecks.SqlServer

Check out the project’s ReadMe file for a full list of what’s available.

Then change the code in the ConfigureServices method in the project’s Startup.cs file.

services.AddHealthChecks()
        .AddSqlServer(connectionString: Configuration.GetConnectionString("SqlServerDatabase"),
                  healthQuery: "SELECT 1;",
                  name: "Sql Server", 
                  failureStatus: HealthStatus.Degraded)
        .AddRedis(redisConnectionString: Configuration.GetConnectionString("RedisCache"),
                        name: "Redis", 
                        failureStatus: HealthStatus.Degraded)
        .AddUrlGroup(new Uri("https://localhost:59658/Home/Index"),
                        name: "Base URL",
                        failureStatus: HealthStatus.Degraded);

Obviously in the example above, I have my connection strings stored in my appsettings.json file.

When I browse to the healthcheck endpoint now, I get much a richer JSON output.

health json

Can this information be displayed in a more friendly dashboard?

We don’t need to just show JSON or text output – Xabaril allows the creation of a clear and simple dashboard to display the health checks in a user friendly form. I updated my code in the StartUp.cs file – first of all, my ConfigureServices method now has the code below:

services.AddHealthChecks()
        .AddSqlServer(connectionString: Configuration.GetConnectionString("SqlServerDatabase"),
                  healthQuery"SELECT 1;",
                  name"Sql Server", 
                  failureStatusHealthStatus.Degraded)
        .AddRedis(redisConnectionString: Configuration.GetConnectionString("RedisCache"),
                        name"Redis", 
                        failureStatusHealthStatus.Degraded)
        .AddUrlGroup(new Uri("https://localhost:59658/Home/Index"),
                        name"Base URL",
                        failureStatusHealthStatus.Degraded);
        
services.AddHealthChecksUI(setupSettings: setup =>
{
    setup.AddHealthCheckEndpoint("Basic healthcheck", "https://localhost:59658/healthcheck");
});

And my Configure method also has the code below.

app.UseHealthChecks("/healthcheck"new HealthCheckOptions
    {
        Predicate = _ => true,
        ResponseWriter = UIResponseWriter.WriteHealthCheckUIResponse
    });
 
app.UseHealthChecksUI();

Now I can browse to a new endpoint which presents the dashboard below:

http://localhost:59658/healthchecks-ui#/healthchecks

health default ui
And if you don’t like the default CSS, you can configure it to use your own. Xabaril has an example of a css file to include here, and I altered my Configure method to the code below which uses this CSS file.

app.UseHealthChecks("/healthcheck"new HealthCheckOptions
    {
        Predicate = _ => true,
        ResponseWriter = UIResponseWriter.WriteHealthCheckUIResponse
    })
    .UseHealthChecksUI(setup =>
    {
        setup.AddCustomStylesheet(@"wwwroot\css\dotnet.css");
    });
 
app.UseHealthChecksUI();

And now the website is styled slightly differently, as you can see in the image below.

health styled ui

What happens when a system component fails?

Let’s break something. I’ve turned off SQL Server, and a few seconds later the UI automatically refreshes to show the overall system health status has changed – as you can see, the SQL Server check has been changed to a status of “Degraded”.

health degrades

And this same error appears in the JSON message.

health degraded json

Can I monitor these endpoints in Azure Application Insights?

Sure – but first make sure your project is configured to use Application Insights.

If you’re not familiar with Application Insights and .NET Core applications, check out some more information here.

If it’s not set up already, you can add the Application Insights Telemetry by right clicking on your project in the Solution Explorer window of VS2019, selecting “Add” from the context menu, and choosing “Application Insights Telemetry…”. This will take you through the wizard to configure your site to use Application Insights.

aitel

Once that’s done, I changed the code in my Startup.cs file’s ConfigureServices method to explicitly push to Application Insights, as shown in the snippet below:

services.AddHealthChecks()
        .AddSqlServer(connectionString: Configuration.GetConnectionString("SqlServerDatabase"),
                  healthQuery"SELECT 1;",
                  name"Sql Server", 
                  failureStatusHealthStatus.Degraded)
        .AddRedis(redisConnectionString: Configuration.GetConnectionString("RedisCache"),
                        name"Redis", 
                        failureStatusHealthStatus.Degraded)
        .AddUrlGroup(new Uri("https://localhost:44398/Home/Index"),
                        name"Base URL",
                        failureStatusHealthStatus.Degraded)
        .AddApplicationInsightsPublisher();
        
services.AddHealthChecksUI(setupSettingssetup =>
{
    setup.AddHealthCheckEndpoint("Basic healthcheck""https://localhost:44398/healthcheck");
});

Now I’m able to view these results in the Application Insights – the way I did this was:

  • First browse to portal.azure.com and click on the “Application Insights” resource which has been created for your web application (it’ll probably be top of the recently created resources).
  • Once that Application Insights blade opens, click on the “Metrics” menu item (highlighted in the image below):

app insights metrics

When the chart windows opens – it’ll look like the image below – click on the “Metric Namespace” dropdown and select the “azure.applicationinsights” value (highlighted below).

app insights custom metric

Once you’ve selected the namespace to plot, choose the specific metric from that namespace. I find that the “AspNetCoreHealthCheckStatus” metric is most useful to me (as shown below).

app insights status

And finally I also choose to display the “Min” value of the status (as shown below), so if anything goes wrong the value plotted will be zero.

app insights aggregation

After this, you’ll have a graph displaying availaility information for your web application. As you can see in the graph below, it’s pretty clear when I turned on my SQL Server instance again so the application health went from a overall health status of ‘Degraded’ to ‘Healthy’.

application insights

Wrapping up

I’ve covered a lot of ground in this post – from .NET Core 2.2’s built in HealthCheck extensions, building on that to use community content to check other site resources like SQL Server and Redis, adding a helpful dashboard, and finally pushing results to Azure Application Insights. I’ve also created a bootstrapper project on GitHub to help anyone else interested in getting started with this – I hope it helps you.


.net core, Azure, C# tip, Clean Code, Dependency Injection, Inversion of Control, MVC

Azure Cache as a session data store in C# and MVC

Using the HTTP Session is one of those things that provokes…opinions. A lot of developers think that sessions are evil. And whereas I understand some of the reasons why that’s a common viewpoint – I’ve had my share of problems with code that uses sessions in the past – I’d have to qualify any criticism by saying the problems were more about how I was using the technique, rather than any inherent problem with sessions as a concept.

For example, some instances where using an in-memory session store can cause problems are:

  • If you chuck lots of website data into an in-memory session, you’ll quickly eat up lots of RAM on your web server. This might eventually cause performance problems.
  • Sessions are often short lived – often around 20 minutes – leading to a poor user experience after a period of inactivity (like being unexpectedly logged out).
  • Also in a load balanced environment, users might experience issues – if their first request leads to a session being created on one web server, and then their next request is routed to a different (less-busy) web server, then it won’t know anything about their previous session. Apparently you can work around this with using sticky sessions…and my own experiences with the sticky sessions approach are best described as “mixed”. But YMMV.
  • If you’re not using SSL/TLS, your session might be vulnerable to the Man-in-the-Middle attack vector. But the easy answer to this is….use SSL.

Anyway – I think most people would agree with the basic need for one web page to access data entered on another web page. However, if you have high throughput, a need for a large session store, or a load balanced environment, then the out-of-the-box HTTP Session object might not be for you. But that doesn’t mean you can’t use sessions at all.

‘Azure Cache for Redis’ to the rescue

So even though my application isn’t in a load-balanced environment right now, I’d still like to make sure it’s easy to port to one in the future. So I’ve been looking for alternatives to using the Session object:

  • I could use Cookies, but I can’t store very much information in them.
  • I could use a SQL database, but this seems heavyweight for my need for shortlived session-based information.
  • Something like a NoSQL store like Redis would suit very well – it’s super fast with low-latency, high-throughput performance.

I’ve written about using Redis as a fast-access data store a long time ago, but that post is out of date now and worth updating as there’s now a built-in Azure option – Azure Cache for Redis.

Spinning up Azure Cache for Redis

Check out the official docs for how to create a cache in Azure – it’s clearly described here with lots of screenshots to guide you through.

But how can I using Azure Cache for Redis in a website?

I don’t really like the ASP.NET implementation from the official documentation. It works, but there’s a lot of code in the controller’s action, and I’d like a cleaner solution. Ideally I’d like to inject an interface into my controller as a dependency, and use ASP.NET Core’s service container to instantiate the dependency on demand.

I found this really useful post from Simon Holman, and he also has created a super helpful example on GitHub. I tested this with an MVC project in .NET Core v2.2, and the implementation is very simple (check out Simon’s source code for exactly where to put these snippets).

  • Update the Startup.cs file’s ConfigureServices method after putting the connection string into your appsettings.json file:
services.AddDistributedRedisCache(options =>
{
    options.Configuration = Configuration.GetConnectionString("RedisCache");
});
 
services.AddSession();
  • Update the Startup.cs file’s Configure method:
app.UseSession();
  • Here’s how to set data into the cache:
var sessionstartTime = DateTime.Now.ToLongTimeString();
HttpContext.Session.SetString("mysessiondata"sessionstartTime);
  • …get data from the cache:
var sessionstartTime = HttpContext.Session.GetString("mysessiondata");
  • …and remove data from the cache:
HttpContext.Session.Remove("mysessiondata");

Some things to bear in mind about Azure Cache for Redis

I wanted to dive into the details of Azure Cache a bit more, just to understand what’s actually going on beneath the hood when we’re reading from, and writing to, the session object.

You can see what session keys are saved in your Redis cache using the Azure portal

redis console arrow

Once you’re in the console, you run the command “scan 0 count 100 match *” to see up to the first 100 keys in your Redis cache.

redis console

From the screenshot above, I can see that I’ve got 16 sessions open.

The Guid in the Key is actually your Session’s *private* “_sessionKey”

In the image above, you can see a bunch of GUID objects which are the keys of the items in my Redis cache. And if you look at the 16th item in the list above, you can see that it corresponds to the private “_sessionKey” value, which is held in my HttpContext.Session object (compare with the VS2019 watch window below).

redis session

So this information is interesting…but I’m not sure how useful it is. Since that property is private, you can’t access it (well you can, but not easily, you have to use reflection). But it might be helpful to know this at debug time.

Browsers behave differently when in incognito mode

I thought I’d try the application with my browser in incognito mode. And every time I hit refresh on the browser when I was in incognito or private browsing mode, a new session key was created on the server – which meant it wasn’t able to obtain data from the session previously created in the same browser instance.

You can see the number of keys has hugely increased in the image below, corresponding to the number of times I hit refresh:

private window redis

But at least I can detect when the session isn’t available through the HttpContext.Session.IsAvailable property – when a session is available, the image below is what I can see in the session using a watch in the VS2019 debugger:

session available

And when a session isn’t available (such as when my browser is in incognito mode), this is what I see:

session unavailable

So at least I can programmatically distinguish between when the session can work for the user and when it can’t.

In summary, this behaviour had a couple of implications for me:

  • Session persistence didn’t work in incognito/private windows – values weren’t persistent in the same session across pages.
  • Hitting refresh a bunch of times in incognito will create lots of orphan session objects in your server, which might have security/availability implications for your application, especially if your sessions are large and fill up available memory.

Clearing down sessions was harder than I thought

HttpContext.Session.Clear() emptied my session, but didn’t delete the key from the server, as I could still see it in the Redis console.

In fact, the only way I was able to remove sessions held in Redis was to get right into the guts of the StackExchange.Redis package using the code below. Since I knew the exact session that I wanted to delete had the key “57154387-d8b7-c361-a174-9d27b6c6caae“:

var connectionMultiplexer = StackExchange.Redis.ConnectionMultiplexer.Connect(Configuration.GetConnectionString("RedisCache"));
 
connectionMultiplexer.GetDatabase(connectionMultiplexer.GetDatabase().Database).KeyDelete("57154387-d8b7-c361-a174-9d27b6c6caae");

But this is only useful if you can get the exact session key that you want to delete, and that isn’t particularly easy. You could use reflection to get that private value like in the code below, but I get why that’s not something you might want to do.

var _sessionKey = typeof(DistributedSession)
                .GetField("_sessionKey"BindingFlags.NonPublic | BindingFlags.Instance)
                .GetValue(HttpContext.Session);

Wrapping up

I’ve talked a little bit about sessions in this post – they’re not a magic hammer, but also aren’t inherently a bad tool – maybe consider an alternative to in-memory sessions if you have large session objects, or are working in a load balanced environment. Azure Cache for Redis might be one of those alternatives. I’ve found it to be interesting and useful, and relatively easy to set up as an alternative to an in-memory session, but there are a few quirks – sessions may not work the way you expect them to for users who are incognito/using private browsing, and it’s hard to completely delete a session once it has been created.

.net core, Azure, Azure DevOps, Azure Pipelines

Everything as Code with Azure DevOps Pipelines: C#, ARM, and YAML: Part #4, Deploying an ARM template to create an Azure App Service with code

This series of posts is about how to use Azure DevOps and Pipelines to set up a basic C# web application, app service infrastructure, and CI/CD pipelines – with everything saved as code in our source code repository.

Last time, I finished up with a coded multi-stage Pipeline, which created three resource groups using a parameterised YAML file. The diagram below is a high level description of the overall system architecture I’ve implemented so far.

resource-group-architecture-diagram

I inserted placeholder to the pipeline for tasks like creating an Azure app service – the diagram below shows all of these stages (including parallel ones) deployed using Azure pipelines.

stages

This time I’ll show how to create a simple Azure App Service using code, and integrate it into my deployment pipeline – by the end of this post I’ll have implemented the infrastructure shown below.

app picture

Create an App Service using Infrastructure as Code

I’m going to use ARM (Azure Resource Manager) templates to create my Azure App Service, which is where I’ll host my website. Using an ARM template allows me to specify all of my my host infrastructure details in code, which makes creating my infrastructure much easier, and more repeatable and stable.

I’ve chosen to use Visual Studio 2019 to create my ARM template – I know a lot of people prefer VSCode, but this is just the way that I’m used to creating templates.

Before starting with Visual Studio 2019, I need to make sure I’ve got the correct packs installed for Azure development – I’ve included a screenshot of the “Azure development” pack I needed to install in my “Visual Studio Updater” (highlighted below in red).

vs azure

Next, I just create a new project in Visual Studio 2019. I’ve selected the “Azure Resource Group” template type, as shown below, and then I click “Next”.

arg picture

The next screen allows me to configure the name of the project (I’ve just called my project SimpleAzureAppService), and where it’s saved. I’ve chosen to save it in the same folder as I’ve used in the previous parts of this series.

This screen offers me an option to select the .NET Framework version, but I don’t really understand the point of this as the ARM templates are JSON files.

arg configure

Next, and probably most importantly, Visual Studio 2019 gives me the option to select what kind of ARM template I want to use. There are a bunch of useful canned templates available, and to create an Azure App Service, I’ve selected the “Web app” template, as shown below.

select azure template

After I click OK on that screen, the ARM project is created. All the magic happens in the WebSite.json file, which is where all the hosting infrastructure is specified. I haven’t altered any parameters – I’ll do that in my Azure Pipeline directly.

I’m not going to talk about the innards of the WebSite.json file here – that’s a whole other series of posts.

solution explorer

At this point I pushed the code up to my public GitHub repository.

Now add a task to the Azure Pipeline

In my Azure DevOps project (which I’ve created in the previous posts, part #2 and part #3), I want to add a new stage in my pipeline which will use this ARM project to deploy my Azure App Service.

I can do this by adding an “Azure Resource Group” task. In the screen where I can edit my pipeline definition file (azure-pipelines.yml), I searched for “Azure Resource Group” in the Tasks window on the right hand side (as highlighted below).

task

Selecting this task will open a window on the right side of the screen like the one below, where you can enter parameters for the task.

arm task

I entered the values for this task that I’ve specified below:

  • Azure Subscription: “Visual Studio Professional with MSDN
    • This might be different for you – and I’m going to replace this with the $(subscription) parameter anyway as I’ve specified it at the top of my azure-pipelines.yml file.
  • Action: Create or update resource group
  • Resource Group: integration-rg
    • This is the resource group created in the previous stage.
  • Region: UK South
  • Template Location: URL of the file
  • Template link: https://raw.githubusercontent.com/jeremylindsayni/EverythingAsCode/master/SimpleAzureAppService/SimpleAzureAppService/WebSite.json
    • Obviously this is specific to my public GitHub repo, it will be different for you.
  • Override template parameters: -hostingPlanName integration-webfarm
    • This is a parameter which is left empty in the ARM file (WebSite.json) that’s generated by Visual Studio 2019. I don’t specify this in the WebSite.parameters.json file because I want to use different parameters in the different environments (i.e. integration, testing, demonstration)
  • Deployment mode: Incremental

When you add this to your YAML, it might complain about indentation or position – for completeness, here’s the YAML stage I’ve used:

stage: deploy_app_service_to_integration
  displayName: 'Deploy the app service to the integration environment'
  dependsOn: build_integration
  jobs:
  - job: deploy_app_service_to_integration
    pool:
      vmImage: 'Ubuntu 16.04'
    steps:
    - task: AzureResourceGroupDeployment@2
      inputs:
        azureSubscription: '$(subscription)'
        action: 'Create Or Update Resource Group'
        resourceGroupName: 'integration-rg'
        location: 'UK South'
        templateLocation: 'URL of the file'
        csmFileLink: 'https://raw.githubusercontent.com/jeremylindsayni/EverythingAsCode/master/SimpleAzureAppService/SimpleAzureAppService/WebSite.json'
        overrideParameters: '-hostingPlanName integration-webfarm'
        deploymentMode: 'Incremental'

Now we can run the pipeline until it finishes, and when I look in my Azure portal, I can see that an App Service plan has been created with an App Service in my “integration-rg” resource group.

webfarm

This is great – using only code, I’m able to specify infrastructure to which I’ll be able to deploy my website. You can even see the default website running in this app service (which will show you a site like the image below) if you browse to the App Service site. For me, I just browse to a site which is the name of my App Service with”.azurewebsites.net” added to the end.

appservice website

But there’s also an Application Insights instance, which strangely has been created in the “East US” region. What’s happened here?

Fortunately, because everything is in code, I’m able to look at what the WebSite.json file has specified and work it out by doing a simple text search. Inside the JSON node that specifies the Application Insights part, the location “East US” is actually hard-coded inside the default template generated by Visual Studio 2019!

{
  "apiVersion""2014-04-01",
  "name""[variables('webSiteName')]",
  "type""Microsoft.Insights/components",
  "location""East US",
  "dependsOn": [
    "[resourceId('Microsoft.Web/sites/', variables('webSiteName'))]"
  ],
  "tags": {
    "[concat('hidden-link:', resourceGroup().id, '/providers/Microsoft.Web/sites/', variables('webSiteName'))]""Resource",
    "displayName""AppInsightsComponent"
  },
  "properties": {
    "applicationId""[variables('webSiteName')]"
  }
}

I’m going to guess that when the template was written, Application Insights was not available in all regions and therefore the authors hardwired a region that they knew would work.

Anyway, I know that Application Insights is available in “UK South”, so I can modify the WebSite.json code to remove the “East US” hardwired reference, and change it to:

"location""[resourceGroup().location]"

And now if I re-run the pipeline, everything is in the UK South region.

webfarm

You’ll also notice that the website is called “webSite” and then seemingly random numbers and letters – this is because it’s coded that way in the “WebSite.json” variables section, as shown below.

"variables": {
  "webSiteName""[concat('webSite', uniqueString(resourceGroup().id))]"
},

Again because this is all in code, I can alter this – say I want my websites to be prefixed with “everythingAsCode-” instead of “webSite”, I can just change the variable to the code below:

"variables": {
  "webSiteName""[concat('everythingAsCode-', uniqueString(resourceGroup().id))]"
}

And after re-running the pipeline, my website has a new name.

newwebfarm

Wrapping up

This post has shown how I can use an ARM template to specify hosting infrastructure for my website. So far, everything in the high-level architecture diagram below has been specified in code.

app picture

I’ve mentioned the advantages of this approach in the previous posts, but I’ll say it again – it blows my mind that I can arrive at a project, pull the source code, and then I can just click a button to build my own copy of the entire infrastructure and deployment pipeline using Azure DevOps. Next time I’ll look at how to deploy the default MVC website written in C# using this approach.

.net core, Azure, Azure DevOps, Azure Pipelines

Everything as Code with Azure DevOps Pipelines: C#, ARM, and YAML: Part #3, resource groups and YAML templates

This series of posts is about how to use Azure DevOps and Pipelines to set up a basic web application, app service infrastructure, and CI/CD pipelines – with everything saved as code in our source code repository.

reference-architecture-diagram-2

Previously I’ve written about how to configure multi-stage pipelines in YAML – I created a simple skeleton of different stages for creating infrastructure and deploying a website to integration, test and demonstration environments. However, the skeleton YAML had no actual build/deploy functionality.

This time I’ll cover a couple of different topics:

  • Creating resource groups for each environment in our overall solution (integration, testing and demonstration).
  • Reducing code duplication by parameterising YAML templates, so that the main pipeline can call smaller YAML templates. This simplifies the overall structure.

As always, my code is available on GitHub here.

A simple YAML template

In the previous post, I created a series of skeleton stages in my pipeline that simply wrote text to the standard output using the echo command. I’d like to start including code in my stages that now does something useful, and the first step in each stage is to create a resource group that can hold all the logically related pieces of infrastructure for each of the 3 environments (integration, test and demo).

It was pretty obvious that there was some similarity in the stages:

  • Build integration infrastructure and deploy the website to this
  • Build test infrastructure and deploy the website to this
  • Build demo infrastructure and deploy the website to this

This kind of repeating pattern is an obvious signal that the code could be parameterised and broken out into a re-usable block.

I’ve created a sample below of how I could do this – the block of code has 4 parameters:

  • name, for the name of the job
  • vmImage, for the type of vm I want my agent to be (e.g. windows, ubuntu etc)
  • displayName, to customise what I want the step to display in my pipeline,
  • resourceGroupName, obviously for the name of the resource group.

Because I just want to change one thing at a time, the code below still just echoes text to standard output.

parameters:
  name: '' 
  vmImage: ''
  displayName: ''
  resourceGroupName: ''

jobs:
- job: ${{ parameters.name }}
  pool: 
    vmImage: ${{ parameters.vmImage }}
  steps:
  - script: echo create resource group for ${{ parameters.resourceGroupName }}
    displayName: ${{ parameters.displayName }}

And I can use this in my main pipeline file – azure-pipelines.yml – as shown below. It’s pretty intuitive – the “jobs” section has a “template” which is just the path to where I’ve saved the template in my source code repository, and then I list out the parameters I want to use for this job.

- stage: build_integration
  displayName: 'Build the integration environment'
  dependsOn: build
  jobs:
  - template: ci/templates/create-resource-group.yml
    parameters:
      name: create_infrastructure
      displayName: 'First step in building the integration infrastructure'
      vmImage: 'Ubuntu-16.04'
      resourceGroupName: integration

Using Tasks in Azure Pipelines – the Azure CLI task

I’ve updated my template in the code below – instead of simply writing what it’s supposed to do, it now uses an Azure CLI task to create a resource group.

The Azure CLI makes this kind of thing quite simple – you just need to tell it the name of your resource group, and where you want to host it. So if I wanted to give my resource group the name”development-rg” and host it in the “UK South” location, the command would be:

az group create -n development-rg -l uksouth

Open the pipeline in Azure DevOps as shown below, and place the cursor where you want to add the task. The “tasks” sidebar is open by default on the right hand side.

task1

In the “tasks” sidebar there’s a search box. I want to add an Azure CLI task so that’s the text I search for – it automatically filters and I’m left with only one type of task.

task2

After clicking on the “Azure CLI” task, the sidebar refreshes to show me what information I need to supply for this task:

  • the Azure subscription to use,
  • what kind of script to run (inline or a file), and
  • the script details (as shown below, I just put the simple resource group creation script inline)

task3

Finally when I click the “Add” at the bottom right of the screen, the YAML corresponding to the task is inserted to my pipeline.

It might not be positioned quite correctly – sometimes I have to hit tab to move it to the correct position. But the Azure DevOps editor uses the red wavy line under any elements which it thinks are in the wrong place to help out.

task4

I find this technique quite useful when I want to generate the YAML for a task, as it makes it easier for me to modify and parameterise it. I’d find it quite hard to write YAML for DevOps tasks from scratch, so I’ll take whatever help I can get.

I’ve tweaked the generated code to parameterise it, and included it as a task in my template below (highlighted in red). I always want to deploy my code to the “UK South” location so I’ve left that as an unparameterised value in the template.

parameters:
  name: '' 
  vmImage: ''
  displayName: ''
  resourceGroupName: ''
  subscription: ''

jobs:
- job: ${{ parameters.name }}
  pool: 
    vmImage: ${{ parameters.vmImage }}
  steps:
  - task: AzureCLI@1
    displayName: ${{ parameters.displayName }}
    inputs:
      azureSubscription: ${{ parameters.subscription }}
      scriptLocation: 'inlineScript'
      inlineScript: az group create -n ${{ parameters.resourceGroupName }}-rg -l uksouth

And as shown earlier, I can call it from my stage by just referencing the template location, and passing in all the parameters that need to be populated for the job to run.

trigger:
- master

variables:
  subscription: 'Visual Studio Professional with MSDN'

stages:

# previous stages...

- stage: build_integration
  displayName: 'Build the integration environment'
  dependsOn: build
  jobs:
  - template: ci/templates/create-resource-group.yml
    parameters:
      name: create_infrastructure
      displayName: 'First step in building the integration infrastructure'
      vmImage: 'Ubuntu-16.04'
      resourceGroupName: integration
      subscription: $(subscription)

# next stages...

And now we have a pipeline that builds the architecture shown below. Still no app service or website, but I’ll write about those in future posts.

resource-group-architecture-diagram

Ironically, there’s now more lines of code in the solution than there would have been if I had just duplicated all the code! But that’s just because this is still pretty early skeleton code. As I build out the YAML to generate infrastructure and do more complex things, the value will become more apparent.

Service connections

Last note – if you take a fork of my repository and try to run this yourself, it’ll probably not run because my Azure subscription is called “Visual Studio Professional with MSDN” and your subscription is probably called something else. You could change the text of the variable in the azure-pipelines.yml file in your fork, or you could also set up a Service Connection with this name.

Setting one up is quite straightforward – hit “Project settings” which lives at the bottom left of your Azure DevOps project, which opens up a window with a list of settings. Select “Service connections” as shown below, and select the “Azure Resource Manager” option after clicking on “New service connection”.

serviceconnection1

This will open a dialog where you can specify the connection name (I chose to call my “Visual Studio Professional with MSDN” but you could call it whatever you want), and you can also select your subscription from the dropdown level. I didn’t need to specify a resource group, and just hit ok. You might be asked for your Azure login and password during this process.

serviceconnection2

Whatever you decided to call your service connection will be the text you can use in your pipeline to specify the subscription Azure should use.

Wrapping up

There’s been a lot of words and pictures here to achieve only a little progress, but it’s a big foundational piece – instead of having a huge YAML pipeline which could become unmaintainable, we can break it up into logical parameterised code blocks. We’ve used the Azure CLI task as an example of how to do this. Next time I’ll write deploying some ARM templates to create an Azure App Service in each of the three environments.

Azure, Azure DevOps, Azure Pipelines, YAML

Everything as Code with Azure DevOps Pipelines: C#, ARM, and YAML: Part #2 – multi-stage builds in YAML

I wrote a post recently introducing some of the work I’ve been doing with Azure DevOps, and ensuring my websites, tests, infrastructure and processes are stored as code in GitHub. This post stretches a bit beyond that introduction, and is about creating a multi-stage pipeline in YAML. I’m going to include lots of screenshots to help you follow along with what I’ve done.

I’m going to try to describe how to do small tasks in each of my next few posts – trying to do everything at once would just be overwhelming.

A multi-stage pipeline

In the last post I’ve described a sample scenario – a client who wants a demonstration of the work I’ve done for them website, and also values stability and system quality. I’ve suggested the architecture below:

reference-architecture-diagram-2

In order to implement this, I can imagine 8 stages in my pipeline:

  1. Build and Test the website pushed to source code;
  2. Build the Integration Environment;
  3. Deploy the website to the Integration Environment;
  4. Build the Test Environment;
  5. Deploy the website to the Test Environment;
  6. Build the Demo Environment;
  7. Deploy the website to the Demo Environment.

And as the 8th stage, I’d like a system quality test (perhaps vulnerability scanning or automated page accessibility checking) to complete after the website is deployed to the Integration Environment.

Let’s see how we can create logical stages in the Azure Build Pipeline to manage each of these operations.

Creating the YAML skeleton in Azure DevOps

As I said earlier, I’m going to build this architecture a bit at a time. In this post, I’m only going to cover creating a skeleton of my build pipelines – creating a series of logically named stages with dependencies.

In the following posts I’ll start populating these stages with tasks like creating resource groups, building infrastructure, running tests and deploying websites to the infrastructure.

First let’s create the source code repository

I’ve created a publically available GitHub repository called EverythingAsCode which is where I’ll store all of my code.

I could have done this in Azure DevOps also, but I’ve chosen work with GitHub this time.

Create a new project in Azure DevOps

The next step for me to log into Azure DevOps and create a project. This is very straightforward – the normal pre-requisite is to set up an account and organisation, and log on to https://dev.azure.com/.

When I’ve logged in, I can see a “Create project” button at the top right of the screen, as shown below.

create project

This opens up a dialog window where I can specify the project name and its visibility.

create devops project

After clicking on “Create”, after a short while the project is created and I can see an empty template.

empty project

Follow the steps in the wizard to create, save and run a single stage Build Pipeline

I click on the Pipelines option in the left navigation menu and see the screen below:

first build pipeline

Remember from the first post in this series that I’m using the multi-stage pipeline preview feature – it’s very simple to switch this on and there’s instructions on how to do this in the first part.

multistagepipelines

I click on “Create Pipeline”, and I’m taken into a wizard to guide me through the process. The first step I’m asked to complete is to choose where my source code lives – I select GitHub because that’s where my “EverythingAsCode” repo lives, but there’s a good selection of alternative options as shown below:

where is your code

When I select the “GitHub” option, the next page shows me my GitHub repositories (I’m logged into GitHub so DevOps knows which ones belong to me). I select the “EverythingAsCode” repo.

select a repository

After selecting this repo, I’m redirected to GitHub where I’m asked to install the Azure Pipelines app for my repo – I scroll to the bottom and hit “Approve and Install”.

azurepipelines

After approving the install, I’m redirected back to my DevOps organisation to carry on with the Wizard.

configure your pipeline

I selected “Starter pipeline”, and I’m taken to the screen shown below – DevOps is showing me a YAML editor, with some simple steps that write text to the standard output.

review your yaml

I hit the “Save and run” button, and then I’m told that this YAML file will be saved in the root of my repository – this is great. My first pipeline is being saved as code in GitHub.

save and run

After I hit “Save and Run”, the code is pushed to my GitHub repo, and the sample pipeline starts running. After clicking on “Pipelines” in the left hand nav and selecting my pipeline, I can see the progress (as shown below).

first run

And if I click on the running job, I’m taken to another screen where I can see the individual steps within the job running. You can see in the screen below how the script has written “Hello, world” to the standard output.

build output

That’s my first fully coded pipeline completed.

github with pipeline

And finally, when I browse to the repository in GitHub, I can see that the YAML file has been saved as code in my source code repository, as shown above.

So that’s single stage – what about multi-stage?

Let’s edit our sample pipeline through the Azure DevOps YAML editor.

First I click on Pipelines in the left hand navigation menu, and see a list of pipelines for the project.

pipelines

The area shown below in the red box above is a clickable area, so I click on this to see the pipeline detail, as shown below. On this detail page, there’s an “Edit” button in the top right (highlighted in a red box in the image below).

edit pipelines

After clicking on “Edit”, I’m taken to a screen which has a rich text editor that allows me to modify my YAML file.

edit yaml

So the starter pipeline was useful to test things were working, but it’s not really want I want. I pasted in the code shown below. This has just three stages right now (build the website, build the infrastructure, and deploy the website to the infrastructure), each of which presently just echo text to standard output.

trigger:
- master

stages:
- stage: build
  displayName: 'Build and test the website'
  jobs:
  - job: run_build
    pool:
      vmImage: 'Ubuntu 16.04'
    steps:
    - script: echo Build
      displayName: 'First step in building the website skeleton'

- stage: build_integration
  displayName: 'Build the integration environment'
  dependsOn: build
  jobs:
  - job: create_infrastructure
    pool:
      vmImage: 'Ubuntu 16.04'
    steps:
    - script: echo Build Integration Infrastructure
      displayName: 'First step in building the integration infrastructure'

- stage: deploy_to_integration
  displayName: 'Deploy the website to the integration environment'
  dependsOn: build_integration
  jobs:
  - job: deploy_artefacts_to_integration
    pool:
      vmImage: 'Ubuntu 16.04'
    steps:
    - script: echo Deploy Website to Integration
      displayName: 'First step in deploying the website to integration'

And when I save and run this, I can see my pipeline has changed in the screen below – I now have three distinct stages in my pipeline, and I can populate each of these with tasks like creating resource groups and deployiing infrastructure.

building with 3 stages

Let’s take this further – and in addition to creating stages for my infrastructure build and release, earlier I also mentioned I’d like stages for the Test and Demo environments also.

I’ve added code into the azure-pipelines.yml file which is available in GitHub – rather than posting pages and pages of code, I recommend you check it out over at GitHub.

When I run my updated code through Azure DevOps, I can now see many more stages in my pipeline, as shown below.

lots more stages

So far it’s a very linear series of stages. But we’ve only done 7 of our 8 stages – what about the 8th, the one where I wanted to run my system quality tests? I want that to depend on the third stage (where I deploy my website to the integration infrastructure) but I don’t want any other stage to depend on this 8th stage (yet, anyway).

It turns out this is quite easy – I can just add in another stage to the YAML, specify what stage it depends on (highlighted in red in the code sample below), and make sure that no other stage depends on this one.

- stage: run_system_quality_tests
  displayName: 'Run the system quality tests'
  dependsOn: deploy_to_integration
  jobs:
  - job: run_non_functional_tests
    pool:
      vmImage: 'Ubuntu 16.04'
    steps:
    - script: echo Run system quality tests
      displayName: 'Running the system quality tests'

And now my pipeline has two stages after deploying the website to integration, with one being an end point to that fork, and the other continuing on to build and deploy to the Test and Demo instances.

added system quality step

Wrapping up

This post has been about creating multi-stage YAML for an Azure Build Pipeline. Next time I’ll write about how to populate these stages with useful Azure tasks.