.net, .net core, Powershell, Raspberry Pi 3

Using PInvoke with .NET Core 2 and Windows 10 IoT Core on the Raspberry Pi 3

Since I’ve been kicking the tyres on .NET Core 2 to see what’s possible with the Raspberry Pi 3, I wondered if it was possible to use PInvoke on the Windows 10 IoT Core operating system – and it turns out that it is.

Let’s write a simple console application and deploy it to a Pi 3 to show PInvoke working.

As usual, you can find the finished code on my GitHub repository here.

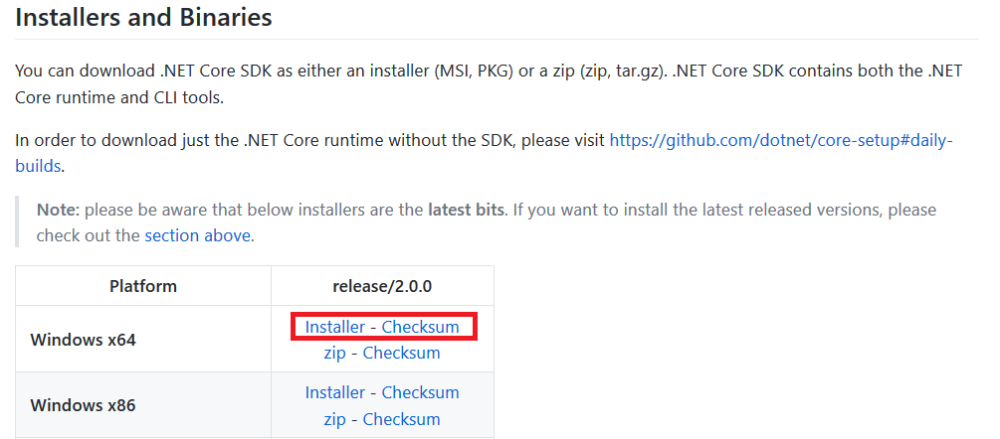
First, install .NET Core 2

You can get the .NET Core 2 installer from here – remember that this version of .NET Core hasn’t made it to RTM status yet, so you’re playing with code at the bleeding edge. I’ve found it to be pretty stable, but I’m working on a machine which I’m happy to trash and rebuild.

screenshot.1492889096

Create a console app for the Raspberry Pi 3

Next, open a PowerShell prompt, and navigate to where you want to create the .NET Core 2 project.

dotnet new -i RaspberryPi.Template::*

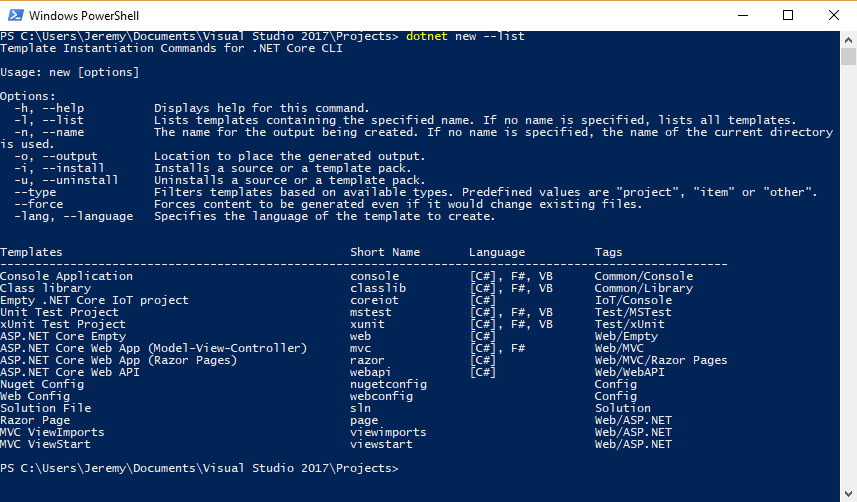
This’ll add the template for a .NET Core 2 Console application which targets IoT devices – you can see this in your list of installed templates if you run:

dotnet new --list

You’ll see it in the list, as shown below.

screenshot.1493574830

So to create this kind of IoT console application, run:

dotnet new coreiot -n RaspberryPi.PInvoke

This creates a new folder and project called “RaspberryPi.PInvoke”, which presently will just write “Hello Internet of Things!” to the console.

Choose an unmanaged function to call – CharUpper

Let’s change this application to make that text – “Hello Internet of Things!” – become upper case. Inside user32.dll, there is a function called CharUpper which will do exactly that.

Obviously we could just use the “ToUpper()” string method inside managed .NET code to achieve this, but this application is a proof of concept to use PInvoke.

The C# signature for this is below:

[DllImport("user32.dll", CharSet=CharSet.Auto)]
static extern char CharUpper(char character);

So we can modify our very simple program to now become like the code below:

using System;
using System.Runtime.InteropServices;
 
namespace RaspberryPiCore
{
    class Program
    {
        [DllImport("user32.dll", CharSet=CharSet.Auto)]
        static extern char CharUpper(char character);
 
        static void Main(string[] args)
        {
            var textToChange = "Hello Internet of Things!";
            var inputCharacterArray = textToChange.ToCharArray();
 
            // array of chars to hold the capitalised text
            var outputCharacterArray = new char[inputCharacterArray.Length];
 
            for(int i = 0; i < inputCharacterArray.Length; i++) 
            {
                outputCharacterArray[i] = CharUpper(inputCharacterArray[i]);
            }
 
            Console.WriteLine($"Original text is {textToChange}");
            Console.WriteLine($"Changed text is {new string(outputCharacterArray)}");
        }
    }
}

Let’s build this using:

dotnet build

Let’s publish it for Windows 10 IoT Core devices with an ARM processor using

dotnet publish -r win8-arm

Let’s open a Powershell prompt to our Raspberry Pi 3, create a folder to host this application.

mkdir c:\ConsoleApps\PInvoke

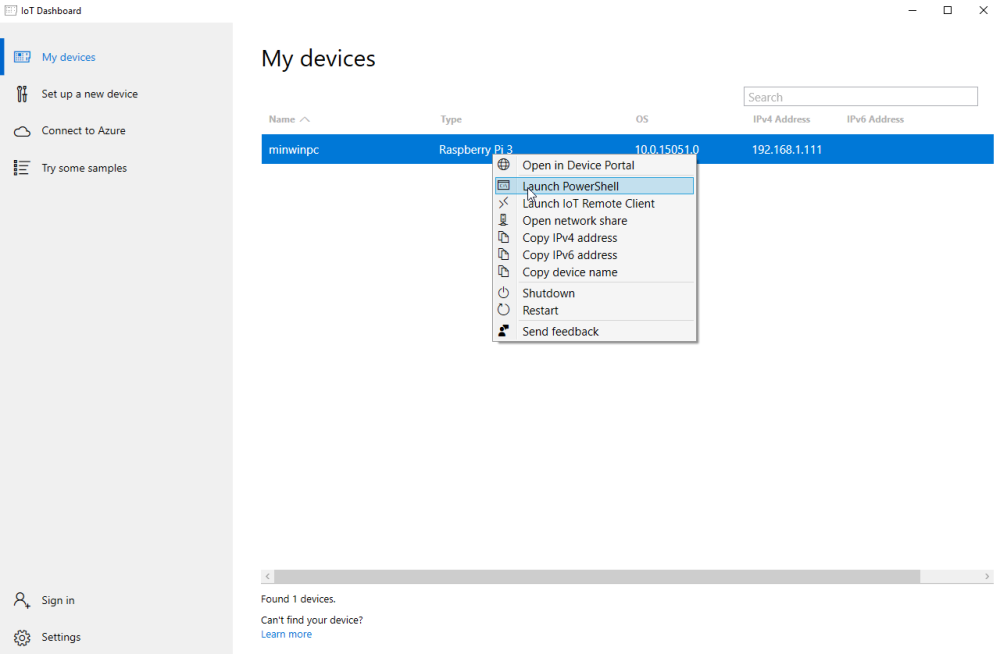
You can ssh to your Raspberry Pi 3 using a Powershell prompt from the Windows IoT Dashboard as shown in the image below:

screenshot.1489958874

And now let’s open a command prompt on our development machine, and copy the application binaries to the directory we created on our Raspberry Pi 3 earlier.

robocopy.exe /MIR ".\bin\Debug\netcoreapp2.0\win8-arm\publish" "\\<your-ipaddress-here>\c$\ConsoleApps\PInvoke"

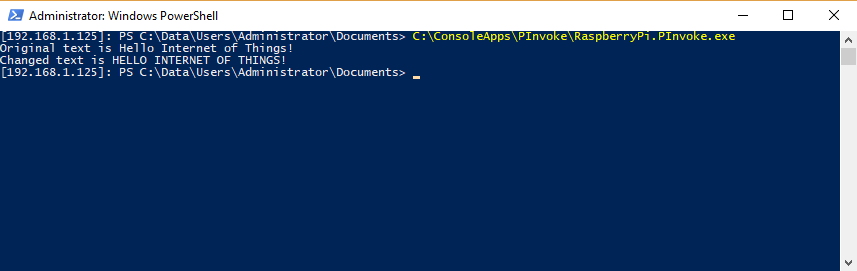
Finally after building, publishing and deploying, we can go back to the ssh PowerShell prompt and run:

C:\ConsoleApps\PInvoke\RaspberryPi.PInvoke.exe

And this shows the text has been changed to upper case, as shown below.

screenshot.1493578558

Wrapping up

There’s nothing special about this code, it’s all pretty standard PInvoke code – but it’s nice to confirm that it works with .NET Core 2 on the Raspberry Pi 3’s ARM processor under Windows 10 IoT Core.

.net, .net core, Powershell

Using PowerShell to install the latest .NET Core 2 preview

I’ve been living on the bleeding edge and programming with the .NET Core 2 preview, which lives at https://github.com/dotnet/cli.

Reasonably frequently I find that I get error messages from the compiler saying there’s been some kind of file binary mismatch between versions, and I resolve this by getting rid of previous versions of .NET Core 2, and clearing out my .NET and Nuget caches.

Since a new build comes out every day, I wrote a simple PowerShell script to automate this process. I’ve highlighted (in red) some paths in the script which you might have to change in your setup if you want to use the script.

This is a pretty savage way to clear dotnet out – it deletes a lot of stuff. I use it on my development machine which I’m happy to trash. If you use this script, treat it very carefully!

Write-Host "About to clear .NET cache from my profile..."
$dotnetProfileFolder = "C:\Users\Jeremy\.dotnet"
Remove-Item $dotnetProfileFolder\* -recurse

# https://jeremylindsayni.wordpress.com/2016/05/24/fixing-rogue-behaviour-in-nuget-by-clearing-the-caches/
Write-Host "About to clear Nuget Cache..."
nuget locals all -clear

# https://blog.jourdant.me/post/3-ways-to-download-files-with-powershell
Write-Host "About to delete existing .NET Core binaries..."
$dotNetSdkFolder = "C:\Program Files\dotnet"
Remove-Item $dotNetSdkFolder\* -recurse

Write-Host "About to download latest .NET Core 2 binaries..."
$url = "https://dotnetcli.blob.core.windows.net/dotnet/Sdk/master/dotnet-dev-win-x64.latest.zip"
$output = "$dotNetSdkFolder\dotnet-dev-win-x64.latest.zip"

Import-Module BitsTransfer
Start-BitsTransfer -Source $url -Destination $output

# https://www.howtogeek.com/tips/how-to-extract-zip-files-using-powershell/
Write-Host "About to unzip latest .NET Core 2 binaries..."
$shell = new-object -com shell.application
$zip = $shell.NameSpace($output)
foreach($item in $zip.items())
{
 $shell.Namespace($dotNetSdkFolder).copyhere($item)
}

Write-Host "Done - dotnet version installed is:"
dotnet --version
.net, .net core, Bifröst, Powershell, Raspberry Pi 3

Project Bifröst – improving deployment of Raspberry Pi apps written in .NET Core 2

Bifröst is a project for developers who want to write .NET Core 2 applications that use IoT devices, and want to target Ubuntu and Windows with the same code.

Last time I wrote an introductory post explaining how this UWP application works and why it’s useful if you want to access GPIO pins. I wrote quite a lot about how to deploy a sample .NET Core application (called GpioSwitcher) – and it occurred to me while writing the post that the deployment process for Raspberry Pi apps from Windows currently sucks. So I’ve written some PowerShell scripts to neatly manage application deployment, which are in the project’s GpioSwitcher directory.

The deployment scripts mentioned in this post aren’t part of the Bifröst UWP application – rather they’re part of a broader project effort to improve the quality of life for .NET developers working in the IoT space.

Improving deployment for the GpioSwitcher application

If you want to just build the application, open PowerShell at the GpioSwitcher project root and run:

.\build.ps1

Deploy to a running Raspberry Pi 3 with Windows 10

This script has two parameters:

  • ip: the ip address of the Raspberry Pi 3 (mine is 192.168.1.125)
  • destination: the network path to where you want the application to be copied (I created a folder named CoreTest in the root, so the network path is “C$\CoreTest”)
.\deploy-windows.ps1 -ip 192.168.1.125 -destination "c$\CoreTest"

So to now run the application and to set pin 26 to logic high: ssh into your Raspberry Pi 3 (either using PuTTY or Powershell), navigate to the directory that you copied the application to, and run:

./GpioSwitcher 26 1

Deploy to a running Raspberry Pi 3 with Ubuntu 16.04

This script has three parameters:

  • ip: the ip address of the Raspberry Pi 3 (mine is 192.168.1.110)
  • destination: the path to where you want the application to be copied (I created a folder named GpioSwitch in my user directory, so the path is “/home/ubuntu/GpioSwitch”)
  • username: the user id that you’ve logged in with (my userid is “ubuntu”)
.\deploy-ubuntu.ps1 -ip 192.168.1.110 -destination "/home/ubuntu/GpioSwitcher" -username ubuntu

(This process will prompt you to enter your Raspberry Pi password.)

So to now run the application and to set pin 26 to logic high: ssh into your Raspberry Pi 3 (either using PuTTY or Powershell), navigate to the directory that you copied the application to, and run:

sudo -E /home/ubuntu/GpioSwitcher/GpioSwitcher 26 1

This is a much better way to deploy applications to a Raspberry Pi hosting Windows or Ubuntu.

.net, Powershell

Assigning an Environment variable using Powershell

As part of deploying my applications to web servers (and other types of servers too), I like to hold certain values as environment variables. It’s possible to add these variables through the standard Windows UI, but I prefer to use command line tools to do this.

I can add environment variables to my own user profile very simply using a normal Powershell prompt.

[Environment]::SetEnvironmentVariable("VARIABLE_NAME", "localhost", "User")

And if I want to add an environment variable at a machine level, I can open a Powershell prompt as Administrator and use the command below:

[Environment]::SetEnvironmentVariable("VARIABLE_NAME", "localhost", "Machine")

This technique is particularly useful while automating the creation of infrastructure.

There’s more information about this here on TechNet.

Continuous Integration, Powershell

How to create and run a Powershell script

Presently my Visual Studio 2015 instance is out of commission because I’m installing Update 2 ahead of the Hololens Dev Kit and Emulator general release tomorrow, so I’ll write a simple post about something that doesn’t need VS2015.

I’ve spoken to a few other C# developers and recommended using Powershell scripts to assist with their continuous deployment. This post is meant to explain one of the simplest things with powershell scripting – how to run a script.

I normally run powershell scripts directly from an instance of Powershell. However, it’s normally necessary to change the computer’s execution policy to be able to run powershell scripts that I’ve created.

As an example, I created a trivial deployment script – the code below copies binaries from a project directory to a deployment directory.

Get-Childitem C:\ProjectDirectory\bin -recurse -filter "*.dll" | %{ Copy-Item -Path $_.FullName -Destination C:\DeploymentDirectory\root}

I saved this to a script called CopyBinaries.ps1.

When I open a powershell window, navigate to the script’s parent directory and run the command “./CopyBinaries.ps1“, I get an error telling me that the file “cannot be loaded because running scripts is disabled on this system“.

This is because the Execution Policy on my machine is set to Restricted, which means I’m not allowed to run any powershell scripts.

To change this, I need to change the execution policy to RemoteSigned. This changes my system to allow me to run powershell scripts that I’ve created locally (which I’m happy to do, because I trust these scripts), and scripts that I’ve downloaded which are digitally signed with the publisher’s identity. There’s more information on execution policies here.

I can change my local policy by running a powershell window as an administrator, and run the command:

Set-ExecutionPolicy RemoteSigned

This asks me to confirm that I intend to do this and understand the consequences – I just type Y to confirm and hit Enter. I can confirm my update to my local execution policy has succeeded by typing:

Get-ExecutionPolicy

Now if I repeat the process of navigating to the script’s parent directory and run the command “./CopyBinaries.ps1“, all binary DLL files are successfully copied from the “C:\ProjectDirectory\bin” to the “C:\DeploymentDirectory\root” directory.